🏨 Hotel Booking Enhancements:
- Implemented Eagle Booking Advanced Pricing add-on
- Added Booking.com-style rate management system
- Created professional calendar interface for pricing
- Integrated deals and discounts functionality

💰 Advanced Pricing Features:
- Dynamic pricing models (per room, per person, per adult)
- Base rates, adult rates, and child rates management
- Length of stay discounts and early bird deals
- Mobile rates and secret deals implementation
- Seasonal promotions and flash sales

📅 Availability Management:
- Real-time availability tracking
- Stop sell and restriction controls
- Closed to arrival/departure functionality
- Minimum/maximum stay requirements
- Automatic sold-out management

💳 Payment Integration:
- Maintained Redsys payment gateway integration
- Seamless integration with existing Eagle Booking
- No modifications to core Eagle Booking plugin

🛠️ Technical Implementation:
- Custom database tables for advanced pricing
- WordPress hooks and filters integration
- AJAX-powered admin interface
- Data migration from existing Eagle Booking
- Professional calendar view for revenue management

📊 Admin Interface:
- Booking.com-style management dashboard
- Visual rate and availability calendar
- Bulk operations for date ranges
- Statistics and analytics dashboard
- Modal dialogs for quick editing

🔧 Code Quality:
- WordPress coding standards compliance
- Secure database operations with prepared statements
- Proper input validation and sanitization
- Error handling and logging
- Responsive admin interface

🤖 Generated with Claude Code (https://claude.ai/code)

Co-Authored-By: Claude <noreply@anthropic.com>
2.0 KiB
2.0 KiB
CMB2-grid
A grid system for Wordpress CMB2 library that allows the creation of columns for a better layout in the admin.
Installation
For now you have to install this as a WordPress plugin:
- Download the plugin
- Place the plugin folder in your
/wp-content/plugins/directory - Activate the plugin in the Plugin dashboard
Usage
Create your cmb2 metabox like you always do:
$prefix = '_yourprefix_demo_';
$cmb = new_cmb2_box(array(
	'id'			 => $prefix . 'metabox',
	'title'			 => __('Test Metabox', 'cmb2'),
	'object_types'	 => array('page',), // Post type
));

$field1 = $cmb->add_field(array(
	'name'		 => __('Test Text', 'cmb2'),
	'desc'		 => __('field description (optional)', 'cmb2'),
	'id'		 => $prefix . 'text',
	'type'		 => 'text',
));

$field2 = $cmb->add_field(array(
	'name'		 => __('Test Text2', 'cmb2'),
	'desc'		 => __('field description2 (optional2)', 'cmb2'),
	'id'		 => $prefix . 'text2',
	'type'		 => 'text',
));
Now, create your columns like this:
if(!is_admin()){
	return;
}
$cmb2Grid = new \Cmb2Grid\Grid\Cmb2Grid($cmb);
$row = $cmb2Grid->addRow();
$row->addColumns(array($field1, $field2));
You can also use custom bootstrap column classes if you want, like this
$row->addColumns(array(
   array($field1, 'class' => 'col-md-8'),
   array($field2, 'class' => 'col-md-4')
));
FAQ
- It works on group fields also
- If you want, you can opt to use the metabox and the field IDs also.
- Currently the grid system is using a lite version of Twitter Bootstrap
- You can create as much rows as you want
- You have to put the fields in the columns in the same order they were created
- You can follow exactly what is in Test/Test.php file to see it in action
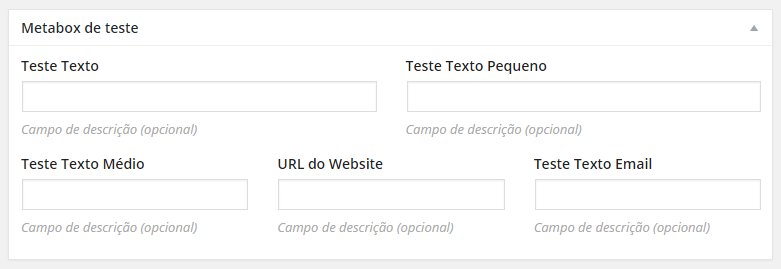
Screenshots
This is what you get using columns